

The beetle whaleboat, p.1
The Beetle Whaleboat, page 1
part #1 of Scratch Built Series


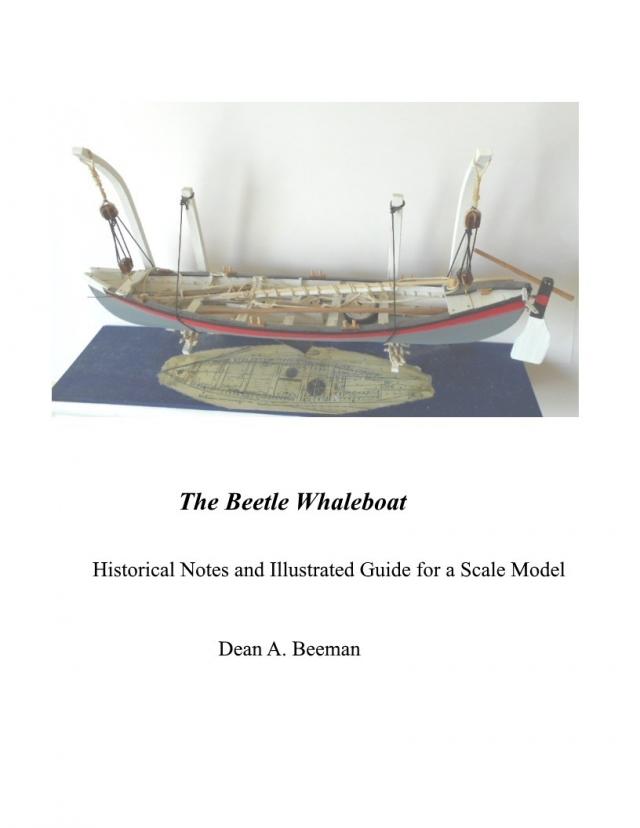
The Beetle Whaleboat
Historical Notes and Illustrated Guide for a Scale Model
By
Dean A. Beeman
Copyright 2012-2017 Dean A. Beeman
All Rights Reserved
No part of this publication may be reproduced, stored in a retrieval system or transmitted in any form or by any means, electronic, mechanical, photocopying, recording, scanning or otherwise without the signed permission from the author. Excerpts made be used for review and promotional purposes.
Limit of Liability/ Disclaimer of Warranty. As the author points out in the text, the instructions in this book involve the use of sharp and otherwise dangerous tools and other items. The author makes no representation that injury will not occur. The author does not guarantee that the results obtained will be acceptable to any person undertaking this or any related project. The instructions and images may not be suitable for any given situation. The author shall not be liable for any errors or omissions, loss of any amount of money including lost profit or any other personal or commercial damages, including but not limited to special, incidental, consequential, personal injury or any other damages.
Table of Contents
Preface
Background
Tools
Materials
The Spine (Stems and Keel)
Vertebrae (Garboard)
The Skin (Strakes)
Body Shape (Final Strakes )
Chest Strength (Ribs)
Keel Furniture
Wales (Gunwales and Rub Rails)
Hull and Rib Protection (Ceiling)
Bracing and Seating (Thwarts and Knees)
Working Components
Mounting (The Boat at Sea)
The Boat Under Sail
Oars and Paddles
Lines and Tubs
Presentation
Harpoons
Finishing Touches and Options
Preface
If this is going to be your first attempt to build a wooden ship model, then time well spent will include reading the text and deciding if building a boat from blank pieces of wood is a good way to relax and enjoy life.
In order to enjoy building a model you will need some well-used and understood tools, a vocabulary of terminology, experience with various woods, glues and paints, but most of all an appreciation for what a particular model represents. Most available kits will fill you in on most of that. Whether you start with a four-foot man-of-war or a ship- in- a-bottle, you will eventually get to the point of scratch-building or you won’t. A kit is a good (and probably the only) place to start. You may want to finish at least one kit first.
Please note the word finish. Based on my experience there are many more unopened kits (dollhouses, airplanes and ships) than builders, and many more builders than abandoned kits. Completing any model lands you in rare company.
This may be the time to point out that a wooden model is quite different from a plastic model. On this boat we are conveying a sense of the original without the detail that is possible using modern plastics. So while a plastic or other molded model should be created with the same detail as the original, the objective here is to capture the original as interpreted by a model builder. There are a fair number of closet plastic modelers who attempt the same precision with wood, thus creating a wooden interpretation of a plastic model. All kits and commercially- built models fall into this same paint-by-numbers chasm.
This model could be completed in less than a week or more than a month with the same level of quality. But whenever I feel the need to speed up and finish a model I just walk away from it for a few days. Speeding the process is like flying home in the middle of a cruise- you get there but miss half the fun.
A text reference that would be very helpful if you can find a copy:
“The Whaleboat: A Study of Design Construction and Use from 1850 to 1970”, Willits D. Ansel, Mystic Seaport Museum, C. 1978). This is the definitive text for this model, and will allow any builder to base a model on all the details of a particular design or incorporate many differing details on one model. It covers the historical periods and design basics in a simple text with many drawings.
I will be using pages from that text to build this boat, but as you’ll see as we go along, any pieces and parts that are unclear will be provided.
These and many other authors acknowledge sections of the original documentation on the subject by George Brown Goode, “The Fisheries and Fishery Industries of the United States”, (7 volumes), Washington, 1887. Many drawings included in Goode, (with Spencer Baird and others) are included in the Ansel text.
If you look closely at the model on the title page, you’ll see a drawing beneath the model. That drawing is a direct copy from the Goode text, and is a classic, because it lays out an entire whaleboat in detail. In order for you to read it on a web page I cut it into 3 sections, and included the original footnotes.
A problem with the history of the whaleboat (and much of all history for that matter) is that the engineering documentation was carried in the heads of the builders and sailors, dying with them: there were as many variations as there were men. As a universal guide we can only rely on good hard speculation and common sense. So as we construct the model I will present some alternatives. These are limited by my research and experience, so they should be expanded and improved by yours.
This model is primarily based on the Beetle boat drawn to scale by R.C. Allyn (Ansel, pp. 133-135). This was chosen because lifting the dimensions directly from the drawing results in a scale of 10mm=1 foot, or a 12-inch model. Since I plan to display the model together with others ranging in size from inches to feet, a large whaleboat would have seemed out of place. The chosen scale will fit in nicely with my fleet. I will provide sketches that correspond to what I am using.
Escaping the necessary confines of a kit it also allows an infinite range of interpretation and construction choices, as we shall see.
Background
Whalers, financed by investors, were very much like farmers- they profited by keeping the cost of their harvest to the barest minimum. The most efficient ships would have been worn-out merchantmen or ships built to carry the largest amounts of oil and baleen with the smallest crews. Boats are carried on ships.
The boats themselves were hybrids based on early Mediterranean theory, with a nod to the skin-on-frame of the Aleut whalers and bark-on-frame of some Native Americans. Whether you choose one or none of these as its precursor, you will recognize the whaleboat concepts in quite a few 21st century boats and other modern designs.
The speed and maneuverability of the whaleboat were noted in detail by the Royal Navy, following a couple of wars that did not go well for them. By then the British had a proud history of constructing their warships based on very detailed scale models approved by the Admiralty. It is not difficult to surmise that boatwrights, including the Beetles, patterned their molds and boats based on this practice. (Ironically, original scale models can be visited at the US Naval Academy Museum in Annapolis. The Rogers Collection, as it is known, is the standard to which any ship model may be compared.)
Unchanged by history is the fact that there has never been a humane way to kill a whale. This text is not the platform to expand on that point. Once stated, let’s get on with the boat.
A convenient way to think about the light weight and strength of the boat is to imagine that it was woven, much like cloth, with light horizontal and vertical components coming together to form a very strong (wooden) whole.
Most sailing ships enjoy a carvel, or smooth hull, so that they glide through water with the least resistance (turbulence). Most smaller boats are lapstrake, or formed by overlapping the hull components (strakes) to achieve the greatest strength with the least material. The whaleboat is a hybrid in this sense, too.
The crew of the main whaling ship (mothership) consisted of a captain (master), a handful of petty officers and a crew. Most of the petty officers were apprentice captains, while most of the multinational crew signed on because that was the only work and food they could find (or in other cases a way of escaping from something or someone). At the end of the cruise, a crewman could have been paid a modest share of the income (lay), or wound up owing money to the owner. Most crewmen, unlike Melville, were not in it for adventure, and they believed, as did some authors, that whales were fish.
The whaleboat, like its mothership, was a tool- once it wore out it was discarded or, more likely, traded for something on some Pacific atoll. It was built with economy in mind- it had to be cheap, work well and, romance aside, keep a small crew alive so they could kill the next whale. It was built on an assembly line: if you substitute wood for metal and bend it rather than stamp it, the boatwright’s shop contained all of the elements of a modern automobile factory. (Of course you would have started with an upside-down body before adding the frame and engine.)
This model would have been built in the mid-19th century. To put it in perspective, from 1840-1849 well over 30,000 whales were killed by more than 700 whalers in the Pacific. (These were mostly Right whales-the Atlantic Right whales had been hunted to extinction by 1800. Far fewer and more difficult Sperm whales were also killed. No sane sailors attempted going after Blue whales- the specter of an annoyed 190-ton mammal bearing down at a speed of 30 mph would have been the common-sense equivalent of gazing at a steam locomotive speeding toward your whaleboat as you sat on the tracks. The largest rhinoceros, by the way, weighs less than 5 tons.)
So this w ould have been one of more than 30,000 whaleboats turned out by assembly lines. Economic theory being what it is, these shops would have been located near raw materials (forests), parts production (sawmills) and customers (whaling ships). At this time in American history, New England was the only region that boasted all three.
Also at this time much of the forests would have been virgin, or first cut. White cedar trees (the main raw material) would have been about forty feet tall, and their branches would have been concentrated toward the forest canopy, with few if any branches (knots) on the lower trunk. White cedar flourished on the alluvial plains (near the coastline), so in addition to its being a very good structural material, it was plentiful, easy to mill, and the trunks would have yielded clear (knot-free) planks. Crotches (where branches meet the trunk), were used to form the strongest boat parts (stems and knees). These and other parts might have been economical if produced by single-man mills, but as mass production drove out the small mills these natural components became man-made.
This boat would have been built at the earlier stages of the Industrial Revolution, when whale oil (train-oil) was the only lubricant available. Very few of the metal items were available at a reasonable cost, and items as simple as the wood screw simply did not exist. Water, and to a lesser extent steam, powered a relatively few land-based machines and vehicles, so the whaleboat and its builders shared technologies that were centuries old. A high-tech fastener on a whaleboat would have been a cut nail, and the sturdiest fastener would have been the copper rivet.
These boats disappeared for the same reason as the first hamburger- they were constructed for a limited life, were consumed, and that’s that. Their documentation, like that of the ships, disappeared for the same reasons. The carpenters who built them took their skills and tools and employed them in more profitable ways- like building mansions for the whaling captains. So while it is interesting to speculate about details that went into any one boat, it is just as interesting to speculate about the people (builders, sailors and buyers).
Much attention has been given to the Beetle boat since it is one of very few that can be documented. (And in fact, the Beetle families of boatwrights were also one of very few families still in that business in the 20th century.) The construction of the whaleboat varied, often by boat, but a certain set of rituals and details were set in stone. Pointless debate over unimportant details does not interest me. Where history, science and common sense don’t completely harmonize I will do my best to note history.
On land, the most common forces are gravity and friction. On sailing ships the most common are pressure (water and air) and mechanical advantage (leverage). These will serve to explain just about every design aspect of the whaleboat as it is being built.
Finally, a note on equifinality.
Equifinality can be thought of as a tool, a state of mind or an objective. As you approach every aspect of scratch-built construction it’s always fun, and usually profitable, to think about what piece or part the boatwright studied, and how it was placed. If it seems that a departure from this or any other text is a good idea, then, by all means do it. The worst that can happen is that you had fun learning something from a disaster. The best that can happen is a better way to build a boat. These outcomes are equifinal.
So let’s begin.
Tools
Every model-building text starts with a tool description. I built my first scratch model using a machinist’s rule, a razor blade, a hat pin and scraps of sandpaper. That model took a while, and I’ve only added tools that fit what I needed. My advice is to read the text, figure out what tools might be handy, and buy them only if you feel you need them. What comes next is the result of many, many models, including the ones in this series.
While I started this series of books with a description of a set of tools for each model, the sets began to look very similar, so here are most of the things I use every day. (In order left to right, top to bottom.)
Scrap Bins- one for short and one for long scraps. Indispensable.
Cord Box. In this assortment I have rigging cords that start at .008 all the way up through sewing thread, button thread and 48-pound hemp.
Clamp Box. In here you’ll find wooden clothespins, adjustable bar clamps, bulldog clamps and paper clamps. Almost hidden in front of that are a couple of ship model planking clamps- I have many more, and they are very handy.
Sanding Wands. I’ll describe these later. There are also some emery boards, a round, small wand and one scrap of many scraps of sandpaper.
Micro files. Sharp and broken-off round, plus the normal assortment. Very handy.
Fences. These are actually metal rulers, a machinist’s rule and a machinist’s square. All stainless steel, to stand up to the knife blades.
Loupe. Only handy if your eyesight is as bad as mine and the work is really tiny. (It will be tiny as we go along.)
Glues. CA gel, craft and wood glue (not interior carpenter’s glue). Mandatory.
Template Bin and wire. All small templates, subassemblies and small parts I’m working with on a given model go in here (transparent is best) or they’ll get lost. We won’t be using that much wire or brass rod.
Pin Board. This once was a piece of foam craft board that now has hat pins and various other pins that I use for marking, gluing, clamping and other things that I forget until I need a specific pin. Stuck into the side are sewing needles of various sizes- there is no logic to explain how they got there.
Scissors. Any sharp pair will do.
Step gauge. You can’t see this too well, but this homemade gauge is cut (stepped off) in 1mm increments from 1-5mm. I have another one stepped off in 1/32nds. As you’ll see when we stab-mark and cut thin strips of basswood these make the job simple and repeatable. If I know I’ll be working in large increments like these, this is also how I measure and cut at the same time.
Tweezers. Large and small, and sooner or later you’ll be filing the tips because they just don’t work right until you do. The tape on a couple of these is to disable the locking feature- sometimes that feature is good, but the spring-loaded pair on the right is usually better.
Masking tape and Q-tips.
Rigging needles. I use two types- the “big eye” and the twisted steel beading needle. The beading needles are much easier to use on small diameter threads.
Saw (draw) blades. Fine (54 teeth per inch) and medium (40 teeth per inch). You’ll need both.
Blade pack. I rarely use anything but X-ACTO #11 blades and I buy them in bulk. This pack of fifteen might last for years or for weeks.
Knives. I keep two of them on the table- the one on the left always has a clean, sharp blade, and the one on the right (red paint) always has a used, not-as-sharp blade for applying glue, breaking out pieces, cutting paper, etc. The red one is the one I use when I know that I’m about to wreck a blade somehow.
French curves and pattern templates. The curves are indispensable.
Dividers- Map (rough) and student (fine). You can’t transfer or repeat any measurement accurately and repeatedly without them.
Beeswax. Handy for preventing lint on cotton line, but indispensable for creating a release when gluing.
Forceps. I also use hemostats, but this is my go-to pair.


